You have scanned QR codes before. On a restaurant menu. On a bill. On a movie ticket. You point your phone, something opens. Simple.
So when you see an Aadhaar QR code, it looks the same. Same black and white squares. Same size. But try scanning it with a regular QR app and nothing useful happens — just a strange link that goes nowhere.
That is not an accident. That QR code is not meant for regular apps. It is built for one specific app, the Aadhaar app, and it is carrying something far more serious than a restaurant link. This article opens up how Aadhaar QR code authentication actually works — every step between the scan and a verified identity.
 Why a Regular QR Scanner Can’t Read an Aadhaar QR Code
When someone creates an Aadhaar QR code, they pack a complete identity verification request inside it. This request is encoded, compressed, and locked with a digital signature. A regular QR scanner can see there is something there — but it cannot make any sense of it. Only the Aadhaar app knows how to unpack and read it properly.
Think of it like a letter written in a coded language. Anyone can hold the letter. Only one person can read it.
Key Concepts Behind Aadhaar QR Code Authentication
Before going further, here is a quick reference for the core technologies used throughout this flow.
JWT (JSON Web Token) — A standardised, structured message format used to exchange information securely between systems. Think of it as a labelled form with defined fields that both computers and developers can read easily.
RSA (Rivest–Shamir–Adleman) — A public-private key system. The sender signs using a private key that only they hold. Anyone with the corresponding public key can verify it, but not forge it.
SHA-256 (Secure Hash Algorithm 256-bit) — A one-way function that takes any input and produces a fixed-length fingerprint called a hash. Even a single character change produces a completely different hash. Used to detect tampering.
GZIP — A standard compression algorithm that shrinks data size, typically to less than half, without losing any information. The same format used when you zip files on your computer.
UUID (Universally Unique Identifier) — A randomly generated 128-bit identifier guaranteed to be unique across all systems and all time. Used here to give each verification request its own one-of-a-kind identity.
QR Code (Quick Response Code) — A two-dimensional barcode that encodes data as a grid of black and white squares, readable by phone cameras. Used here as the delivery mechanism for the entire signed verification request.
Inside the JWT Payload
The core of the QR code is a JWT — a structured container used to exchange information securely between systems. Think of it as a standardised form with labelled fields that must be filled in; both computers and developers can read it easily. This single JWT contains several pieces of information.
txn — Transaction ID: A UUID that gives this specific request its own one-of-a-kind identity. No two requests ever share the same UUID. This stops anyone from copying an old QR code and submitting it again — the system recognises and rejects any repeated UUID immediately. This is called preventing a replay attack.
sc — Scope: A 64-bit checklist called a bitmask. Each position in this string of ones and zeroes corresponds to one Aadhaar attribute — name, photo, date of birth, address, gender. A 1 means “I am requesting this.” A 0 means “I am not.” The requesting organisation only ever receives what they explicitly switched on. Nothing extra.
pop — Proof of Possession: A simple flag, 1 or 0. If set to 1, the Aadhaar app will require a biometric face scan before proceeding. If 0, it skips the face scan. This is decided by whoever created the QR code, not by the person scanning it. You cannot change it at scan time.
exp — Expiry Time: A Unix timestamp telling the app exactly when this request becomes invalid. Standard practice is five minutes from creation. After that, the QR code is dead, even if the signature is perfectly valid.
cb — Callback URL: The web address where the verified Aadhaar details should be delivered once authentication is complete.
iss — Issuer: Identifies the organisation that created and signed this request.
jti — JWT ID: A second UUID, this one uniquely identifying the token itself rather than the transaction. It works alongside txn to double-guard against replay attacks.
Securing the Payload with RS256
Once the JWT payload is ready, it needs to be sealed so nobody can tamper with it. This is done using RS256, which is two technologies working together.
The first is SHA-256. This takes the entire JWT payload and produces a short fixed-length fingerprint called a hash. Even changing a single character in the payload produces a completely different hash. You cannot reverse-engineer the original message from the hash alone.
The second is RSA, a public-private key system. The organisation creating the QR code holds a private key that nobody else has. It uses that key to sign the SHA-256 hash, producing the final digital signature.
When the Aadhaar app scans the QR code, it uses the organisation’s public key to verify that signature. If the payload was tampered with even slightly, verification fails and the request is rejected on the spot.
Together, SHA-256 and RSA make RS256 — the same family of technology that secures online banking worldwide. The JWT is now signed and trustworthy.
Compressing the Payload to Fit a QR Code
A signed JWT with all its fields, a callback URL, and a digital signature is quite long. If you tried to put it directly into a QR code, the result would be so dense with tiny squares that a phone camera would struggle to read it.
So two more steps happen.
First, GZIP compression shrinks the data, typically to less than half its original size. No information is lost. It is the same compression used when you zip a folder of files on your computer.
Second, the compressed data is converted into a BigInteger — one very large decimal number. This number is then written as a plain Base-10 string (just digits, no special characters) and placed inside an intent URL, a special deep link that tells the phone’s operating system to open the Aadhaar app automatically when scanned.
That URL becomes the QR code image, usually delivered as a Base64-encoded PNG.
What Happens When You Scan an Aadhaar QR Code
The Aadhaar app reads the intent URL, extracts the Base-10 number, reverses the BigInteger conversion, decompresses the GZIP data, and recovers the original signed JWT.
Then it checks three things in order.
Signature verification — The app recalculates the SHA-256 hash of the payload and compares it against the hash recovered from the RS256 signature using the issuer’s public key. A match means genuine. No match means tampered, and the request is rejected.
Expiry check — The app reads the exp field. If the current time is past that timestamp, the request is rejected regardless of how valid the signature looks.
Face authentication — If the pop flag is 1, the camera activates and runs a biometric face match against the photo in your Aadhaar record. This step includes liveness detection — confirming a real person is present, not a photograph or video replay. If pop is 0, this step is skipped entirely.
If all checks pass, the request goes to UIDAI’s servers for final validation.
The SD-JWT Response and OVSE Callback
After UIDAI confirms your identity, the verified data is sent to the callback URL as an SD-JWT — a Selective Disclosure JSON Web Token.
This is a privacy-first credential format. Instead of bundling all your Aadhaar data into one block, SD-JWT packages each attribute — name, date of birth, gender, address, photo — as a separate disclosure. Only the disclosures for attributes that were requested via the scope bitmask are included in the response.
Each disclosure also contains a randomly generated salt — a string added to each attribute before encoding. This ensures that even two people with the same value (say, both have gender “Male”) produce completely different encoded disclosures. Without salt, an attacker could build a lookup table and reverse-engineer values from the encodings. The salt makes that impossible.
The verified data lands at your callback API, also referred to as the OVSE (Online Verification Service Endpoint). Think of it as the backend server your organisation runs specifically to receive Aadhaar verification results. It sits behind the callback URL that was baked into the original QR code, waiting to receive, decode, and store whatever UIDAI sends back. This callback API decodes each disclosure individually, matches the data against the original txn UUID, and stores only what was asked for. Nothing more ever arrives.
XML Acknowledgement and Session Closure
After the OVSE successfully processes the SD-JWT, there is one final step that most explanations skip over: the system must tell the Aadhaar app that the response was received and processed correctly.
This acknowledgement is sent as an XML response posted back to the same callback URL. Without it, the Aadhaar app has no way of knowing whether the verified data was actually delivered to the right system or silently dropped somewhere in transit.
The XML payload looks like this:
<Response>
  <TxnID>550e8400-e29b-41d4-a716-446655440000</TxnID>
  <ResponseCode>200</ResponseCode>
  <ResponseMsg>Success</ResponseMsg>
</Response>
Each field plays a specific role:
TxnID — This must echo back the exact same UUID that was embedded in the original QR code. The Aadhaar app uses this to match the acknowledgement to the correct pending verification request. If the TxnID does not match, the app treats the response as orphaned and will not close the session cleanly.
ResponseCode — A standard HTTP-style status code. A 200 means everything worked. Any other value signals a failure condition that the app and the OVSE can use for debugging or retry logic.
ResponseMsg — A human-readable confirmation string. “Success” is the standard value for a clean flow. Error conditions carry a descriptive message here instead.
This XML response is what makes the verification loop complete. The flow only fully closes when the Aadhaar app receives this acknowledgement, reads the TxnID, confirms it matches, and marks the session as done. Every step before it — the JWT, the RS256 signature, the SD-JWT disclosures — was building toward this final handshake.
The Security Layers That Make Aadhaar QR Code Authentication Work
The strength of Aadhaar QR code authentication does not rely on any single mechanism. It is layered — each step covers a gap the previous one cannot.
- UUID + jti stop the same request being submitted twice (replay attack prevention).
- exp timestamp makes stolen or photographed QR codes expire within minutes.
- RS256 signature (SHA-256 + RSA) makes tampering with the JWT instantly detectable.
- GZIP + BigInteger make the payload unreadable to anything other than the Aadhaar app.
- pop flag + liveness detection confirm the real person is physically present when required.
- Scope bitmask ensures only the requested attributes are ever shared (data minimisation).
- SD-JWT with salt ensures each attribute is individually verifiable and privacy-protected, with no possibility of cross-user correlation.
Remove any single layer and a specific attack vector opens up. The RS256 signature proves the request came from a trusted organisation and was not modified in transit. The expiry timestamp makes even a valid, unmodified QR code useless after a few minutes. The UUID makes sure even an unexpired valid QR code cannot be submitted twice. The liveness check confirms the person present is the actual Aadhaar holder. The scope bitmask enforces data minimisation. And the salted SD-JWT disclosures keep the response verifiable at the attribute level. Together, they close every known angle.
Common Aadhaar QR Code Authentication Failures (and How to Resolve Them)
Developers supporting or debugging this system will encounter the following failure conditions.
Expired QR Code — The exp timestamp in the JWT has passed (typically five minutes after generation). The Aadhaar app rejects the request at the expiry check before it ever reaches UIDAI. Resolution: the user must request a fresh QR code. There is no way to extend a QR once generated.
Invalid Signature — The RS256 signature verification fails. This means either the JWT payload was tampered with after signing, or the wrong public key was used for verification. Resolution: check that the issuer’s public key in the Aadhaar app matches the private key used during QR generation. Re-generate the QR if the payload was modified.
Face Authentication Failure — The biometric face match did not pass. This can happen due to poor lighting, the user presenting a photograph instead of their live face (liveness detection catches this), or a genuine mismatch. Resolution: retry under better conditions. Repeated failures should be escalated to support, as they may indicate an Aadhaar record issue.
Callback Timeout — UIDAI sent the SD-JWT to the OVSE callback URL, but the OVSE did not respond within the expected window. From the Aadhaar app’s perspective, the session hangs without an XML acknowledgement. Resolution: check OVSE server availability and response times. Ensure the callback URL in the JWT is reachable from UIDAI’s servers.
UUID Replay Attempt — The same txn UUID is submitted more than once. UIDAI’s servers reject the second and all subsequent submissions immediately. This is a security control, not a bug. Resolution: always generate a fresh UUID per QR code. Never cache or reuse QR codes across sessions.
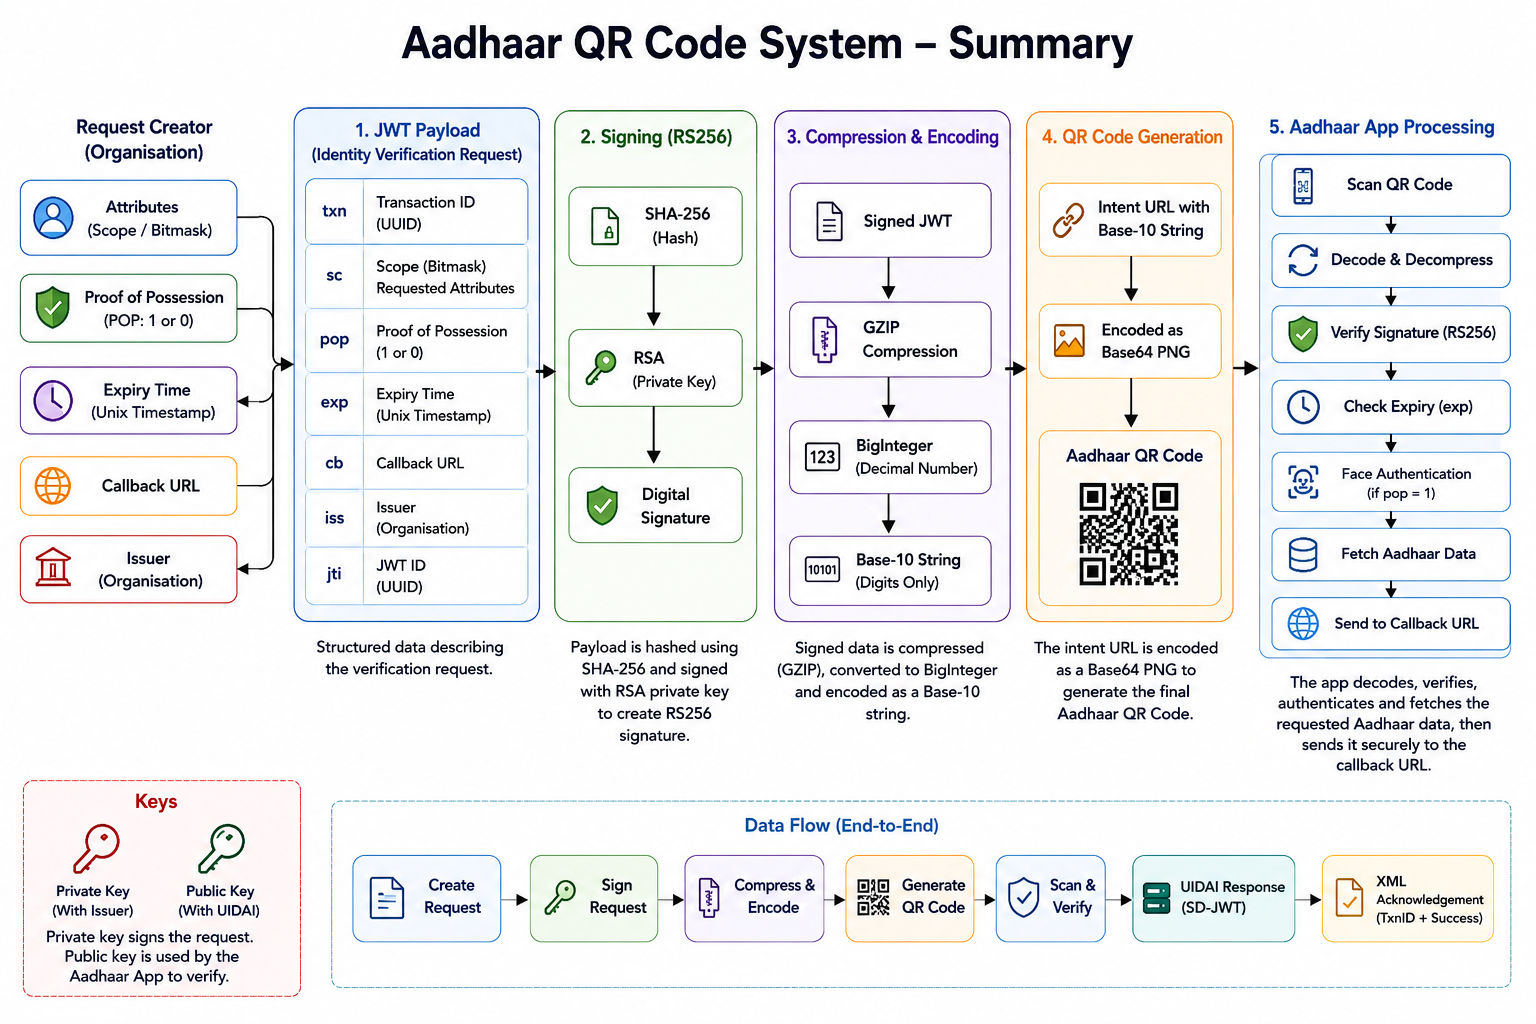
Aadhaar QR Code Authentication, End to End
A UUID is generated and packed into a JWT payload along with a scope bitmask, a pop flag, an expiry timestamp, and a callback URL. The JWT is signed using RS256 — SHA-256 hashing plus RSA. The signed JWT is GZIP-compressed, converted into a BigInteger, written as a Base-10 string, embedded in an intent URL, and turned into a QR code image.
When scanned by the Aadhaar app, everything reverses: the RS256 signature is verified, the expiry is checked, biometric face auth runs if pop is 1, and the request goes to UIDAI. The verified response comes back as an SD-JWT to the OVSE callback, with each Aadhaar attribute delivered as a salted individual disclosure. The OVSE processes it and posts an XML acknowledgement back, closing the session.
Conclusion
What looks like a simple black and white square is actually a multi-layered security protocol — one that handles identity verification, tamper detection, replay prevention, biometric confirmation, privacy-preserving data sharing, and session closure in a single scan.
Every component has a reason. Every step closes a specific vulnerability. That is the full picture of Aadhaar QR code authentication, from a black and white square to a verified identity.

